


Why does my vacuum smell? This could indicate dust buildup, clogged filters, or even mold lurking inside. This article explores the common causes of vacuum smells and provides simple, effective ways to remove and prevent them, helping you maintain a cleaner, fresher home.
Why Does My Vacuum Smell Bad? (Main Causes)
Vacuum smells because it traps dirt, pet hair, moisture, or debris, which can break down and produce an unpleasant smell if not cleaned regularly.
Below are the common causes of vacuum cleaner smells.
Dust and Dirt Build-Up
Vacuum cleaners collect dust, dirt, and small particles every time you use them. If the dust canister or bag isn’t emptied often, this debris starts to break down, producing bad smells.
Dust buildup can also clog filters, making the problem worse. A full canister or clogged vacuum bag will trap the smell inside, leading to unpleasant smells every time the vacuum runs.
Pet Hair and Dander
Pet owners may find the vacuum starts to smell faster. Pet hair carries oils, smells, and bacteria that stick inside the vacuum's components. Even if you vacuum regularly, these trapped particles create an unpleasant odor over time. Dander, the tiny flakes of dead skin from pets, can also settle inside and contribute to the bad smell.
Mold and Mildew Growth
If you vacuum damp surfaces or use your vacuum in humid areas, moisture can get trapped inside. Mold and mildew thrive in wet conditions, leading to a musty smell. Once mold grows inside the hose, filters, or dust compartment, it becomes harder to remove and can spread smell each time you vacuum.
Clogged or Dirty Filters
Vacuum filter plays a crucial role in capturing dust, allergens, and other particles to keep the air clean. However, the filter can be clogged with dirt over time. A dirty filter not only reduces the vacuum’s performance but also produces a stale, dusty smell that lingers in the air.
What If Your Vacuum Smells Like Burning?
A burning smell from your vacuum is usually a sign of a mechanical issue. It could mean the belt is slipping, or the motor is overheating. If the belt is worn out, it may rub against other parts and produce a rubbery smell.
When the vacuum smells like burning, it is better to check for damage earlier.
Overheating Motor Problems
An overheating motor is a common cause of burnt smells in vacuums, often due to clogged filters or a worn-out belt. This strain on the motor can create a burning rubber odor, and in severe cases, lead to a motor burnout. Regular maintenance, like cleaning filters and checking the belt, helps prevent these issues and keeps your vacuum running efficiently.
Full Dust Bin Odors
A full dust bin can cause unpleasant smells in vacuums, as trapped dirt and organic material can foster bacteria and mold growth. This is also true for robot vacuums with self-emptying features. To avoid odors, regularly empty and clean the dustbin, ensuring no buildup that could create bad smells.
Why Does a Vacuum Mop Smell?
A vacuum mop smells because it deals with both dust and moisture. In fact, odor is one of the most common robot vacuum issues users face. Dust buildup, pet hair, clogged filters, or moisture in dirty water tanks can all cause unpleasant smells if not cleaned regularly.
- Wet mop pads trap moisture, leading to mildew and musty smells, especially if not dried after use.
- Stagnant water in the tank fosters bacteria and mold, causing strong, unpleasant smells if not cleaned promptly.
- Leftover detergent inside the tank, tubes, or mop pads can build up and produce sour smells over time. In many cases, cleaning solution buildup inside a robot mop is what causes that sour smell.
If you want a vacuum mop without odor problems, the Narwal S30 Pro Wet Dry Vacuum is an even smarter choice. With powerful 20,000 Pa suction and built-in 194 °F hot-water self-cleaning, it automatically washes and dries its brush after every use—preventing moisture, bacteria, and odor from building up.
[cta:narwal-s30-pro-wet-dry-vacuum]
The S30 Pro also separates wet and dry waste and features hygienic, hands-free disposal, so you never have to touch dirty water or tangled hair. This thoughtful design keeps the entire system clean, dry, and fresh, giving you a truly worry-free cleaning experience every time.
 Now that you understand what causes these smells, let’s look at how to get rid of them step-by-step.
How to Get Rid of Vacuum Odor Step-by-Step
The best way to get rid of unpleasant smells from your vacuum is through regular cleaning and a few simple maintenance habits. Follow this step-by-step process to restore freshness and prevent future odors.
Step 1: Empty the Dust Canister or Replace the Bag
Start by emptying the dust canister or replacing the vacuum bag after every use. When dirt, pet hair, or moisture stays inside for too long, it begins to break down and create unpleasant smells. If you frequently vacuum pet hair or damp surfaces, clean the canister right after use to prevent bacteria and odor buildup.
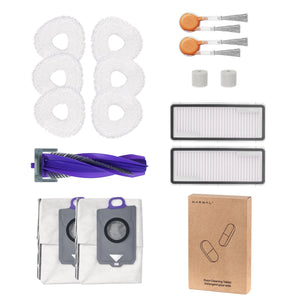
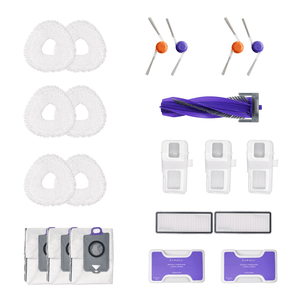
Step 2: Clean or Replace the Filters
Filters are one of the most common sources of vacuum odors. They trap dust, allergens, and odor particles every time you clean. Remove the filter and check your vacuum’s manual to see whether it’s washable. Washable filters should be rinsed under warm, soapy water and left to air dry completely before reinstalling. Never put a damp filter back—it can cause mold and further odors.
For non-washable filters, such as HEPA filters, tap them gently to remove dust and replace them every three to six months to maintain optimal performance. According to most manufacturers, replacing HEPA filters every 3–6 months helps maintain suction and reduce odors.
Step 3: Deep Clean the Brush Roll and Hoses
Hair, dust, and food debris often get trapped in the brush roll and hoses, and over time, they start to rot and smell. Remove the brush roll and give the vacuum brush roll a thorough clean with warm, soapy water, scrubbing off any buildup. Use a long brush or a stick to clear out the hose, rinse it thoroughly, and let both parts dry completely before reassembling. Moisture left behind can quickly cause mildew and new odors.
Step 4: Neutralize Odors Naturally
Once the main components are clean, it’s time to tackle lingering smells. Sprinkle a small amount of baking soda inside the canister or bag—it naturally absorbs odor and keeps the vacuum fresh. However, avoid vacuuming baking soda directly from the floor, as its fine particles can clog filters and reduce suction power. You can also use natural deodorizers like activated charcoal or dry coffee grounds. Place them in a breathable pouch inside the canister to absorb odors without damaging the machine.
Step 5: Keep It Fresh with Regular Maintenance
Odor prevention is always easier than odor removal. Make it a habit to clean your filters every few weeks and deep-clean the vacuum every month. After each use, ensure all parts are completely dry before storage, and keep your vacuum in a cool, ventilated area. With consistent care, your vacuum will stay clean, efficient, and odor-free.
How to Prevent Vacuum Smells from Coming Back
Keeping your vacuum odor-free over time comes down to two simple habits: regular maintenance and proper storage. A little routine care goes a long way toward preventing the buildup of dirt, bacteria, and mold that cause bad smells.
Stick to a Regular Maintenance Routine
Odor prevention starts with consistency. To keep your device running smoothly, make it a habit to maintain your robot vacuum regularly — empty the dust canister, clean the brush roll, and wash or replace the filters every few weeks. These simple habits not only prevent odors but also extend the machine’s lifespan. If you have pets or clean frequently, aim for weekly maintenance. Regular cleaning stops debris and pet hair from decomposing inside the vacuum and keeps airflow fresh.
Pay special attention to HEPA filters, which can trap fine particles and odors. Wash them if they’re reusable, or replace them every few months according to the manufacturer’s instructions. Keeping filters fresh not only prevents smells but also helps your vacuum perform more efficiently.
Store in a Dry, Well-Ventilated Space
Once your vacuum is clean, make sure it stays that way. Moisture is one of the biggest causes of lingering odors and mold growth inside vacuums. After each use, ensure all parts — especially hoses and filters — are completely dry before storage.
Choose a cool, dry, and well-ventilated spot such as a closet, pantry, or utility room. Avoid damp basements, laundry rooms, or garages where humidity is high. Proper storage keeps your vacuum dry, prevents mildew, and ensures that the next time you use it, it smells as fresh as your home.
In short, prevention is much easier than odor removal. A few simple habits — regular cleaning, dry storage, and filter care — can make a lasting difference in keeping your vacuum fresh and odor-free. Storing your vacuum properly not only prevents bad smells but also extends its lifespan and suction performance.
Ultimate Solution: Narwal Flow
Revolutionary FlowWash Mopping System: The Narwal Flow keeps its mop pads clean at every step with real-time self-cleaning and warm water rinsing. Each pass uses a freshly cleaned mop, so dirt and odors are never spread around your home.
Hyper Suction Power (22,000 Pa): With industry-leading suction, Flow effortlessly removes stubborn debris, dust, and pet hair from both hard floors and carpets. Its CarpetFocus Technology detects carpet fibers and automatically boosts suction while lifting the mop to keep surfaces dry and fresh.
DualFlow Tangle-Free System: Built-in anti-tangle rollers and side brushes prevent hair from wrapping, keeping performance strong and odor-free. This means less maintenance and no more buildup that can lead to smells.
Smart & Hygienic Base Station: Flow’s maintenance-free base automatically rinses the mop with warm water, dries it with gentle heat, and even cleans the internal pipes and tank. By preventing moisture and bacterial growth, it keeps the entire system clean and odor-free after every cycle.
[cta:flow-robot-vacuum-and-mop]
Summary
Keeping your vacuum fresh and odor-free comes down to regular cleaning and proper storage. A little consistent care can go a long way in keeping your home clean and your air fresh.
However, if you find it hard to maintain that routine—or if your vacuum mop starts to smell even after cleaning—technology can help. A self-cleaning model like Narwal Flow automatically washes and dries its mops after every use, preventing moisture buildup and eliminating odors before they start.
With intelligent water management and drying technology, the Narwal Flow takes care of the part most people forget — keeping your mop pads clean, dry, and fresh for the next use. It’s a simple, hands-free way to maintain a cleaner home without worrying about unpleasant smells. Whether you maintain your current vacuum or upgrade to a self-cleaning model, the key is consistency — clean, dry, and store it right.
FAQs
Is it okay to vacuum baking soda?
No, vacuuming baking soda is not recommended. Baking soda is made of very fine particles that can easily clog filters and reduce suction power. Instead of vacuuming it directly, sprinkle a small amount inside the canister or bag to help absorb odors safely.
How often should I clean or replace my vacuum filter to prevent smells?
You should clean washable filters every two to four weeks and replace non-washable filters, such as HEPA filters, every three to six months. If you vacuum frequently or have pets, clean or replace the filters more often to prevent odors and bacteria buildup.
Why does my vacuum still smell after cleaning it?
Your vacuum may still smell because some odor sources were missed, such as the hose, brush roll, or hidden mold inside the dust bin. Moisture, trapped pet hair, or dirt in tight areas can also cause lingering smells. Make sure all parts are completely clean and dry before reassembling.
Can I use air fresheners or essential oils in my vacuum?
No, using air fresheners or essential oils inside your vacuum is not recommended. Liquids can damage filters or the motor. Use dry odor absorbers like baking soda, activated charcoal, or coffee grounds placed in a breathable bag instead.
What’s the best way to store my vacuum to prevent bad smells?
Store your vacuum in a cool, dry, and well-ventilated area. Avoid damp basements or laundry rooms, as moisture can lead to mold and mildew. Always empty the canister and ensure all components are completely dry before storage.


